Creating and Hosting a Personal Site on GitHub
A step-by-step beginner's guide to creating a personal website and blog using Jekyll and hosting it for free using GitHub Pages.
This guide is meant to help Git and GitHub beginners get up and running with GitHub Pages and Jekyll in an afternoon. It assumes you know very little about version control, Git, and GitHub. It is helpful if you know the basics of HTML and CSS since we'll be working directly with these languages. We'll also be using a little bit of Markdown, but by no means do you need to be an expert with any of these languages. The idea is to learn by doing, so the code we'll be implementing in this tutorial is available in this guide or can be downloaded entirely at this GitHub repo. Feel free to copy and paste or type this code directly into your project's files.
For a little background on why I chose GitHub and GitHub Pages for my personal website (and other projects), see this note.
Other Resources You Should Know
In order to make GitHub Pages accessible to a wider audience, this guide focuses on using the web interface on github.com to build your personal website, thereby generalizing and glossing over the standard tools associated with Git and GitHub. To get a lot dirtier with Git and GitHub (ie, the command line and terminal), there are several other great guides you should also know about, probably bookmark, and read after completing this one, or jump over to if that is more your speed: Anna Debenham, Thinkful, and even GitHub itself go above and beyond making the command line or local workflow of GitHub hosting and Jekyll templates accessible to a wider audience.
Also, at the end of this document, there is a pretty good list of resources related to Git, GitHub/Pages, Jekyll, and Markdown that can help you dive deeper into these tools. I'll do my best to keep this list updated as I find new ones.
What is Git, GitHub, and GitHub Pages?
Git, GitHub, and GitHub Pages are all very closely related. Imagine Git as the workflow to get things done and GitHub and GitHub Pages as places to store the work you finish. Projects that use Git are stored publicly in GitHub and GitHub Pages, so in a very generalized way, Git is what you do locally on your own computer and GitHub is the place where all this gets stored publicly on a server.
Git
Git is a version control system that tracks changes to files in a project over time. It typically records what the changes were (what was added? what was removed from the file?), who made the changes, notes and comments about the changes by the changer, and at what time the changes were made. It is primarily used for software development projects which are often collaborative, so in this sense, it is a tool to help enable and improve collaboration. However, its collaborative nature has led it to gain interest in the publishing community as a tool to help in both authoring and editorial workflows.
Git is for people who want to maintain multiple versions of their files in an efficient manner and travel back in time to visit different versions without juggling numerous files along with their confusing names stored at different locations. Think of Git and version control like a magic undo button.
In the diagram below, each stage represents a “save”. Without Git, you cannot go back to any of the in between stages from the initial draft and final draft. If you wanted to change the opening paragraph in the final draft, you’d have to delete data that you couldn’t recover. To work around this, we use the “save as” option, name it something different, delete the opening paragraph and start writing a new one.
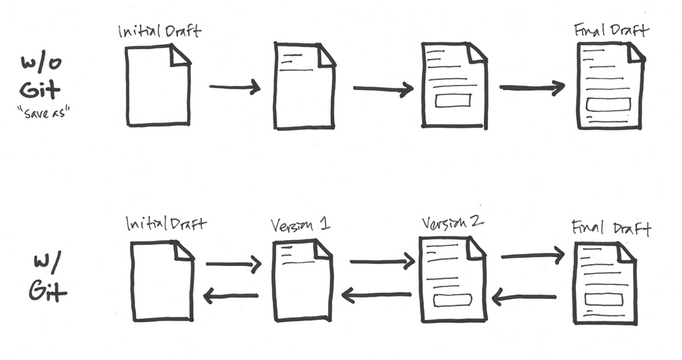
With Git, the flow is multidirectional. Each change that is significant is marked as important in a version, and you proceed. If you need to get back to earlier stages, you can without any loss of data. Presently, Google Docs “revision history” or Wikipedia’s “edit history” work in this sort of fashion. Git is just a lot more detailed and can get a lot more complex if needed.1
When you have the chance, I highly recommend this 15 minute, hands-on web tutorial on using Git.
GitHub
GitHub is a web hosting service for the source code of software and web development projects (or other text based projects) that use Git. In many cases, most of the code is publicly available, enabling developers to easily investigate, collaborate, download, use, improve, and remix that code. The container for the code of a specific project is called a repository.
There are thousands of really cool and exciting repositories on GitHub, with new ones added every day. Some examples of popular software development projects that make their code available on GitHub include:
- Twitter Bootstrap, an extremely popular front-end framework for mobile first websites, created by developers at Twitter.
- HTML5 Boilerplate, a front-end template for quickly building websites,
- The JavaScript Visualization Library D3
- Ruby on Rails, the open-source web framework built on Ruby.
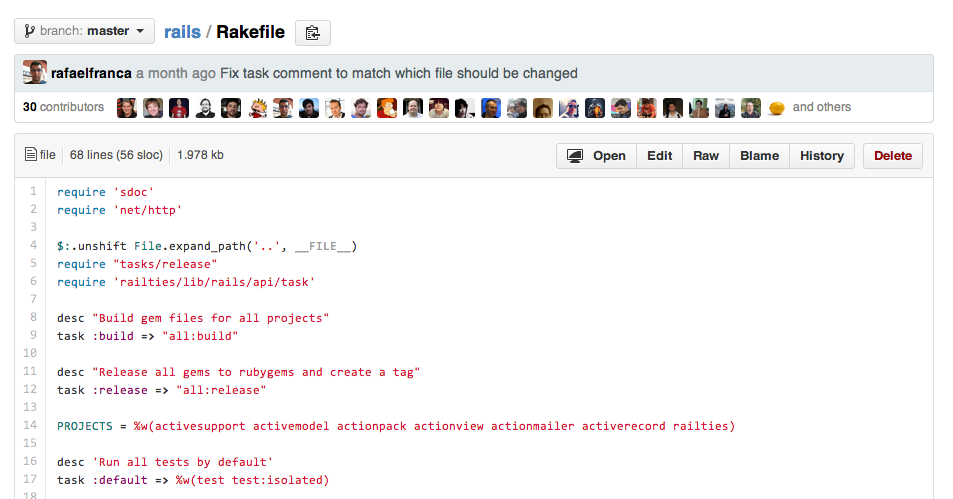
Usually, people just host the files that contain their code, so what you see on the end view is the actual code, as in this example from the Ruby on Rails project:
GitHub Pages
GitHub Pages are public webpages hosted for free through GitHub. GitHub users can create and host both personal websites (one allowed per user) and websites related to specific GitHub projects. Pages lets you do the same things as GitHub, but if the repository is named a certain way and files inside it are HTML or Markdown, you can view the file like any other website. GitHub Pages is the self-aware version of GitHub. Pages also comes with a powerful static site generator called Jekyll, which we'll learn more about later on.
Getting Started with GitHub Pages
Don't worry if some of these concepts are still a little fuzzy to you. The best way to learn this stuff is to just start doing the work, so let's not waste anymore time and dive right in.
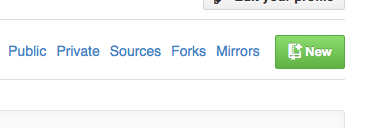
1Create your project's repository. Login to your GitHub account and go to https://github.com/new or click the New repository icon from your account homepage.
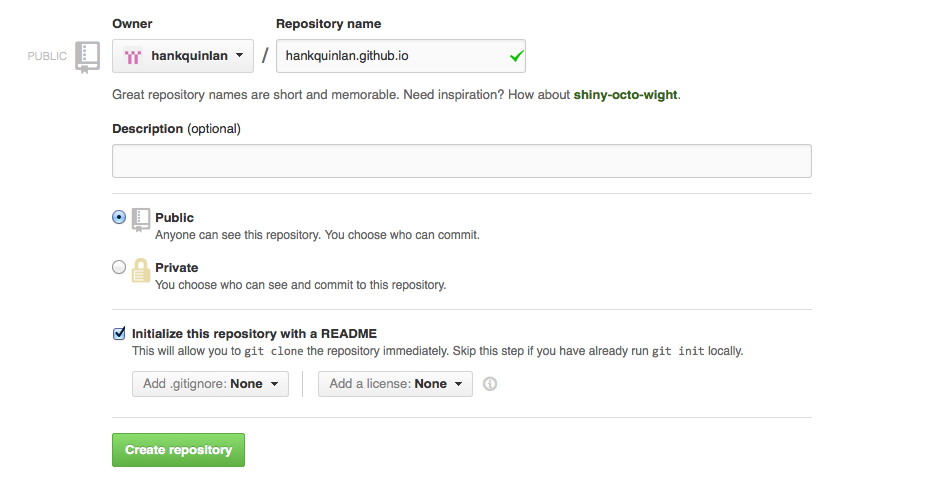
2 Name your repository username.github.io, replacing username with your GitHub username. Be sure it is public and go ahead and tell GitHub to create a README file upon generating the repo.
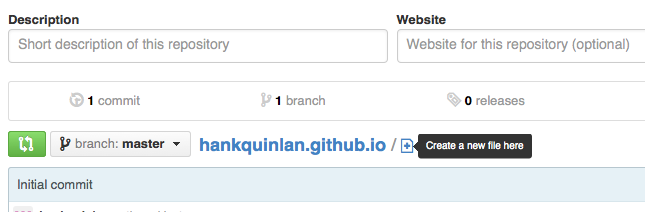
3 Create an index.html page by clicking the plus icon next to your repository name and typing the file name directly in the input box that appears.
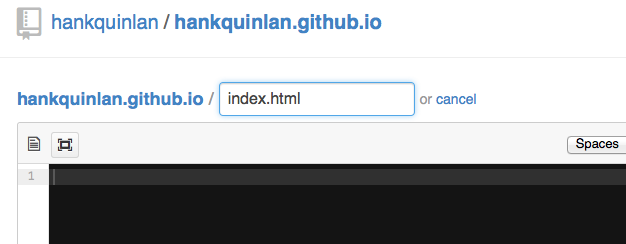
On the resulting page, put this markup inside of the GitHub text editor:
<!DOCTYPE html>
<html>
<head>
<title>Hank Quinlan, Horrible Cop</title>
</head>
<body>
<nav>
<ul>
<li><a href="/">Home</a></li>
<li><a href="/about">About</a></li>
<li><a href="/cv">CV</a></li>
<li><a href="/blog">Blog</a></li>
</ul>
</nav>
<div class="container">
<div class="blurb">
<h1>Hi there, I'm Hank Quinlan!</h1>
<p>I'm best known as the horrible cop from <em>A Touch of Evil</em> Don't trust me. <a href="/about">Read more about my life...</a></p>
</div><!-- /.blurb -->
</div><!-- /.container -->
<footer>
<ul>
<li><a href="mailto:hankquinlanhub@gmail.com">email</a></li>
<li><a href="https://github.com/hankquinlan">github.com/hankquinlan</a></li>
</ul>
</footer>
</body>
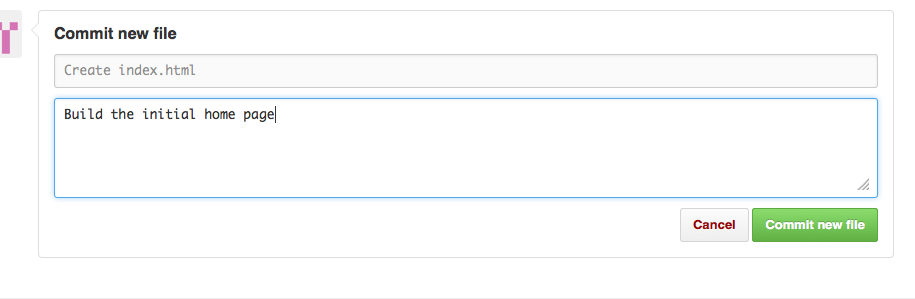
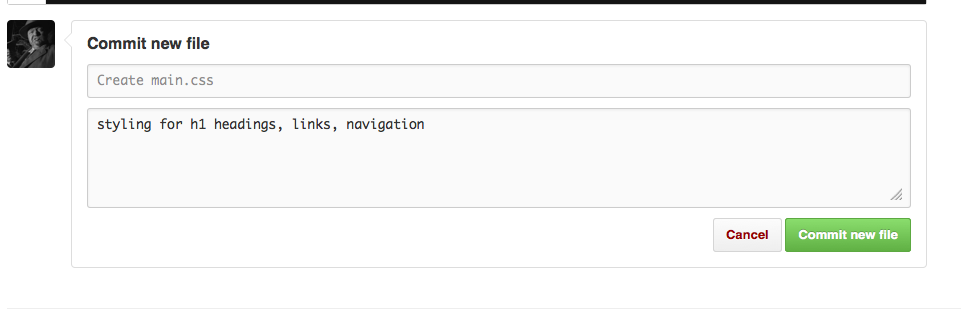
</html>4 Commit index.html. At the bottom of the page, there is a text input area to add a description of your changes and a button to commit the file.
Congrats! You just built your first GitHub Pages site. View it at http://username.github.io. Usually the first time your GitHub Pages site is created it takes 5-10 minutes to go live, so while we wait for that to happen, let's style your otherwise plain HTML site.
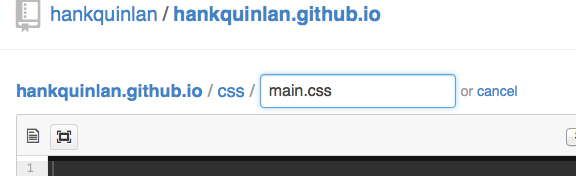
5 To style the content go back to your repository home and create a new file named css/main.css. The css/ before the filename will automatically create a subdirectory called css. Pretty neat.
Place the following inside main.css:
body {
    margin: 60px auto;
    width: 70%;
}
nav ul, footer ul {
    font-family:'Helvetica', 'Arial', 'Sans-Serif';
    padding: 0px;
    list-style: none;
    font-weight: bold;
}
nav ul li, footer ul li {
    display: inline;
    margin-right: 20px;
}
a {
    text-decoration: none;
    color: #999;
}
a:hover {
    text-decoration: underline;
}
h1 {
    font-size: 3em;
    font-family:'Helvetica', 'Arial', 'Sans-Serif';
}
p {
    font-size: 1.5em;
    line-height: 1.4em;
    color: #333;
}
footer {
    border-top: 1px solid #d5d5d5;
    font-size: .8em;
}

ul.posts {
    margin: 20px auto 40px;
    font-size: 1.5em;
}

ul.posts li {
    list-style: none;
}
Don't forget to commit the new CSS file!
6 Link to your CSS file inside your HTML document's <head>. Go back to index.html and select the "Edit" button.

Add a link to main.css (new markup is in bold):
<!DOCTYPE html>
<html>
	<head>
		<title>Hank Quinlan, Horrible Cop</title>
		<!-- link to main stylesheet -->
		<link rel="stylesheet" type="text/css" href="/css/main.css">
	</head>
	<body>
		<nav>
    		<ul>
        		<li><a href="/">Home</a></li>
	        	<li><a href="/about">About</a></li>
        		<li><a href="/cv">CV</a></li>
        		<li><a href="/blog">Blog</a></li>
    		</ul>
		</nav>
		<div class="container">
    		<div class="blurb">
        		<h1>Hi there, I'm Hank Quinlan!</h1>
				<p>I'm best known as the horrible cop from <em>A Touch of Evil</em> Don't trust me. <a href="/about">Read more about my life...</a></p>
    		</div><!-- /.blurb -->
		</div><!-- /.container -->
		<footer>
    		<ul>
        		<li><a href="mailto:hankquinlanhub@gmail.com">email</a></li>
        		<li><a href="https://github.com/hankquinlan">github.com/hankquinlan</a></li>
			</ul>
		</footer>
	</body>
</html>
Visit http://username.github.io to see your styled website. It should look like the page at http://hankquinlan.github.io.
Using Jekyll with GitHub Pages
Like GitHub Pages, Jekyll is self-aware, so if you add folders and files following specific naming conventions, when you commit to GitHub, Jekyll will magically build your website.
While I recommend setting up Jekyll on your own computer so you can edit and preview your site locally, and when ready, push those changes to your GitHub repo, we're not going to do that. Instead, to quickly get a handle on how Jekyll works, we're going to build it into our GitHub repo using the GitHub web interface.
What is Jekyll?
Jekyll is a very powerful static site generator. In some senses, it is a throwback to the days of static HTML before databases were used to store website content. For simple sites without complex architectures, like a personal website, this is a huge plus. When used alongside GitHub, Jekyll will automatically re-generate all the HTML pages for your website each time you commit a file.
Jekyll makes managing your website easier because it depends on templates. Templates (or layouts in Jekyll nomenclature) are your best friend when using a static site generator. Instead of repeating the same navigation markup on every page I create, which I'd have to edit on every page if I add, remove, or change the location of navigation item, I can create what Jekyll calls a layout that gets used on all my pages. In this tutorial, we're going to create two Jekyll templates to help power your website.
Setting Up Jekyll on github.com
In order for Jekyll to work with your site, you need to follow Jekyll's directory structure. To learn about this structure, we're going to build it right into our GitHub repo.
7 Create a .gitignore file. This file tells Git to ignore the _site directory that Jekyll automatically generates each time you commit. Because this directory and all the files inside are written each time you commit, you do not want this directory under version control.

Add this simple line to the file:
_site/
8 Create a _config.yml file that tells Jekyll some basics about your project. In this example, we're telling Jekyll the name of our site and what version of Markdown we'd like to use:
	name: Hank Quinlan, Horrible Cop
	markdown: kramdown
At this point, I'm hopeful that you've got the hang of creating files and directories using the GitHub web interface, so I'm going stop using screenshots to illustrate those actions.
9Make a _layouts directory, and create file inside it called default.html. (Remember, you can make directories while making new files. See the main.css step if you forgot.)
This is our main layout that will contain repeated elements like our <head> and <footer>. Now we won't have to repeat that markup on every single page we create, making maintenance of our site much easier. So let's move those elements from index.html into default.html to get something that looks like this in the end:
<!DOCTYPE html>
	<html>
		<head>
			<title>{{ page.title }}</title>
			<!-- link to main stylesheet -->
			<link rel="stylesheet" type="text/css" href="/css/main.css">
		</head>
		<body>
			<nav>
	    		<ul>
	        		<li><a href="/">Home</a></li>
		        	<li><a href="/about">About</a></li>
	        		<li><a href="/cv">CV</a></li>
	        		<li><a href="/blog">Blog</a></li>
	    		</ul>
			</nav>
			<div class="container">

			{{ content }}

			</div><!-- /.container -->
			<footer>
	    		<ul>
	        		<li><a href="mailto:hankquinlanhub@gmail.com">email</a></li>
	        		<li><a href="https://github.com/hankquinlan">github.com/hankquinlan</a></li>
				</ul>
			</footer>
		</body>
	</html>
Take note of the {{ page.title }} and {{ content }} tags in there. They're what Jekyll calls liquid tags, and these are used to inject content into the final web page. More on this in a bit.
10 Now update your index.html to use your default layout. Replace the entire contents of that file with this:
---
layout: default
title: Hank Quinlan, Horrible Cop
---
<div class="blurb">
	<h1>Hi there, I'm Hank Quinlan!</h1>
	<p>I'm best known as the horrible cop from <em>A Touch of Evil</em> Don't trust me. <a href="/about">Read more about my life...</a></p>
</div><!-- /.blurb -->
Notice the plain text at the top of the file. Jekyll calls this the Front-matter. Any file on your site that contains this will be processed by Jekyll. Every time you commit a file that specifies layout: default at the top, Jekyll will magically generate the full HTML document by replacing {{ content }} in _layouts/default.html with the contents of the committed file. Awesome!
Setting up a Blog
A Jekyll-based blog uses the same conventions that we've familiarized ourselves with in the previous steps, but takes things further by adding a few more for us to follow. Jekyll is very flexible allowing you to extend your site as you wish, but in this guide we're only going to cover the basics: creating a post, making a page to list our posts, creating a custom permalink for posts, and creating an RSS feed for the blog.
We'll want to create a new layout for our blog posts called post.html and a folder to store each individual post called _posts/.
11 Start by creating the layout. Create a file named post.html in your _layouts folder. Notice the post layout uses the default layout as it's base, and adds a couple new liquid tags to print the title of the post and date:
---
layout: default
---
<h1>{{ page.title }}</h1>
<p class="meta">{{ page.date | date_to_string }}</p>

<div class="post">
  {{ content }}
</div>
12 Make a _posts/ directory where we'll store our blog posts. Inside that folder will be our first post. Jekyll is very strict with how these files are named, so pay attention. It must follow the convention YYYY-MM-DD-title-of-my-post.md. This file name gets translated into the permalink for the blog post. So in this example, we'll create a file named 2014-04-30-hank-quinlan-site-launched.md:
---
layout: post
title: "Hank Quinlan, Horrible Cop, Launches Site"
date: 2014-04-30
---

Well. Finally got around to putting this old website together. Neat thing about it - powered by [Jekyll](http://jekyllrb.com) and I can use Markdown to author my posts. It actually is a lot easier than I thought it was going to be.
Note the file extension .md stands for Markdown, and the Markdown syntax used inside the file gets converted to HTML by Jekyll. Like Wikitext, Markdown is a markup language with a syntax closer to plain text. The idea of Markdown is to get out of the author's way so they can write their HTML content quickly, making Markdown very suitable as a blog authoring syntax. If you aren't already, you'll want to get familiar with Markdown syntax, and this printable cheatsheet (PDF) will be your best friend.
After committing the new post, navigate to http://username.github.io/YYYY/MM/DD/name-of-your-post to view it.
All this is great, but your readers won't always know the exact URLs of your posts. So next we need to create a page on our site that lists each post's title and hyperlink. You could create this list on your homepage or alternatively, create a blog subpage that collects all of your posts. We're going to do the latter.
13 Create a blog directory and create a file named index.html inside it. To list each post, we'll use a foreach loop to create an unordered list of our blog posts:
---
layout: default
title: Hank Quinlan's Blog
---
	<h1>{{ page.title }}</h1>
	<ul class="posts">

	  {% for post in site.posts %}
	    <li><span>{{ post.date | date_to_string }}</span> » <a href="{{ post.url }}" title="{{ post.title }}">{{ post.title }}</a></li>
	  {% endfor %}
	</ul>
Now checkout http://username.github.io/blog/. You should see your first post listed and linked there. Nice job!
Customizing Your Blog
We've only begun to scratch the surface with Jekyll's blog aware functionality. This guide is only going to cover a couple more steps you might want to take for your blog.
You may have noticed that the URL of your blog post does not include the blog directory in it. In Jekyll we can control the structure of our permalinks by editing the _config.yml file we created in Step 8. So let's change our permalink structure to include the blog directory.
14 Edit the _config.yml file. Add the following line at the end of the file:
permalink: /blog/:year/:month/:day/:titleNow your blog posts will live at http://username.github.io/blog/YYYY/MM/DD/name-of-your-post.
It is also very easy to setup an RSS feed for your blog. Every time you publish a new post, it will get added to this RSS file.
15 Inside your blog/ directory create a file and name it atom.xml. Add this to file:
---
layout: feed
---
<?xml version="1.0" encoding="utf-8"?>
<feed xmlns="http://www.w3.org/2005/Atom">

	<title>Hank Quinlan's Blog</title>
	<link href="http://hankquinlan.github.io/blog/atom.xml" rel="self"/>
	<link href="http://hankquinlan.github.io/blog"/>
	<updated>{{ site.time | date_to_xmlschema }}</updated>
	<id>http://hankquinlan.github.io/blog</id>
	<author>
		<name>Hank Quinlan</name>
		<email>hankquinlanhub@gmail.com</email>
	</author>

	{% for post in site.posts %}
		<entry>
			<title>{{ post.title }}</title>
			<link href="http://hankquinlan.github.io{{ post.url }}"/>
			<updated>{{ post.date | date_to_xmlschema }}</updated>
			<id>http://hankquinlan.github.io{{ post.id }}</id>
			<content type="html">{{ post.content | xml_escape }}</content>
		</entry>
	{% endfor %}

</feed>
Now you can include a link to your RSS feed somewhere on your site for users to subscribe to your blog in their feed aggregator of choice. Navigate to http://username.github.io/blog/atom.xml to view your feed.
Wrapping Up
16 You're almost done! Don't forget to create and commit your about/index.html and cv/index.html pages. Since I'm sure you've got the hang of things now, I'll back off and let you get these pages finished on your own.
17 Before going any further, take the time to setup Git and Jekyll on your own computer. This tutorial is all about Git in the web browser, so really it's only the half way point. You're going to have to do this if you want to be able to upload image or PDF files to your GitHub repo. GitHub's tutorials and desktop application make local setup easy, and now that you know many of Git and GitHub's basic concepts, you should be able to get this going. Go do it!
Next Steps
Hopefully this guide has given you the confidence to do many other things with Git, GitHub, Jekyll, and your website or blog. You could go in many different directions at this point, as I'm sure you've already started thinking about, but here are a few other things I think would be worth your time:
- Create
_includes. They're a lot like_layouts, only smaller snippets of markup and can be injected into your_layoutsand pages.- Try creating an
_includefile that inserts Google Analytics tracking code into your<head>so you can get stats on the visitors to your website. Here's an example. - Want commenting for your blog? Create a DISQUS
_includeand call it in yourpost.htmllayout.
- Try creating an
- Don't want github.io in your URL? Set up a custom domain.
- Add blogging pagination
- Create a
sitemap.xmlfile for better SEO. You can have one automatically generated by GitHub Pages. See this one I use for my site. - Become a coding pro and create a
developmentbranch of your site. Each time you want to fix a bug or add a new feature you can create a copy of your master branch, make your changes, and then merge that branch to the master branch. The idea is to keep the master branch clean. - Need more inspiration? Check out how the sites from the developers of Jekyll are setup or browse this huge list of sites using Jekyll.
Resources
I'll try to keep this list current and up to date. If you know of a great resource you'd like to share or notice a broken link, please get in touch.
Git, GitHub, and GitHub Pages
- Git Documentation
- Learn Git and GitHub in 15 minutes
- GitHub Pages Help
- GitHub Help
- GitHub Cheat Sheet
- GitHub Glossary
- GitHub For Academics
Jekyll
Markdown
Notes
1. Somasundaram, R. (2013). Git: Version Control for Everyone (pp. 9-17). Birmingham, UK: Packt Publishing.